Unable to Unzip the Fire Please Try Again Chromebook
Summary :
Chromebook Recovery Utility is useful for troubleshooting bug related to the Chromebook OS. However, some errors can upshot in the Chromebook Recovery Utility not working result. MiniTool summarizes these issues and offers the respective solutions in this mail service.
Quick Navigation :
- An Overview of Chromebook Recovery Utility
- #1. Download Interrupted
- #2. Unable to Unzip File
- #3. Verification Failed
- #4. An Unexpected Error Has Occurred
- #5. The Device You Inserted Does Not Contain Chrome Bone
- #half dozen. Please Remove All Connected Devices and Commencement Recovery
- #7. The Security Module on This Device Is Not Working
- Bottom Line
- User Comments
An Overview of Chromebook Recovery Utility
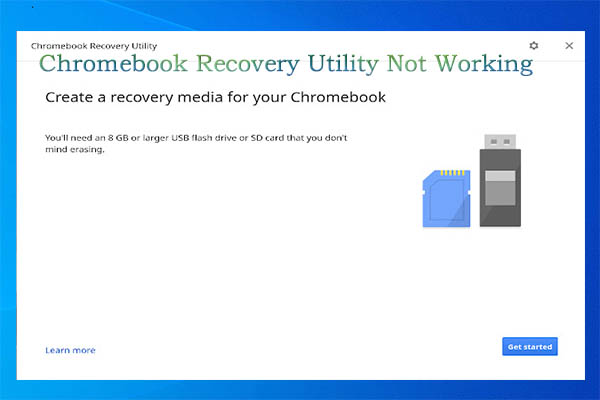
Chromebook Recovery Utility is an embedded feature in the Chrome system, which tin can be used to recover any devices running the Chrome OS as it tin create a fill-in of Chrome OS. It is a practiced idea to create a recovery drive by using the Chromebook Recovery Utility.
Tip: If you don't know how to create the recovery drive, this total guide is worth reading: Chromebook Recovery Utility: How to Create and Utilize It
When you run across the post-obit bug, prepare them with the created recovery drive.
- The Chromebook oftentimes reboots or can't boot upward.
- Later y'all turn on the Chromebook, it shows a white screen.
- The Chromebook crashes, freezes, or shows errors like Chrome Os is missing or damaged.
- In that location are some bug with the Chromebook, Chromebox, and other devices running the Chrome Os.
Nonetheless, Chromebook Recovery Utility is not perfect. For instance, you lot may suffer from the Chromebook Recovery Utility not working error. The specific example varies from person to person. Various errors tin trigger the Chrome Bone recovery not working issue.
What are they? Hither, we summarize 7 commonly encountered issues when Chromebook Recovery Utility not working. You lot tin can follow the corresponding fixes for the outcome.
#1. Download Interrupted
You may encounter the download interrupted fault considering of a hiccup in the Wi-Fi or Ethernet connectedness. This is a trouble occurred while creating the recovery drive. To repair this issue, you can double-click that if you are connected or online.
If not, restart your modem, disconnect and reconnect to your network, try connecting to some other network, utilize your phone's hotspot, or restart your PC to gear up the issue.
#2. Unable to Unzip File
The "Unable to unzip file" fault usually appears when the Chromebook Recovery Utility tries to create the USB recovery bulldoze but fails. It is also a trouble occurred while creating the recovery bulldoze. What's worse, this error happens randomly without the specific reason. After looking into the Chrome Bone recovery not working issue, nosotros notice some available solutions to it.
Solution 1: Ensure that You Have Plenty Bachelor Space
When the screen goes black and the unzip procedure ends, it is very likely that the Chromebook doesn't take arable infinite. More often than not speaking, you need to ensure that there is 8GB free infinite at least on the Chromebook to download the file.
Merely you are usually required to prepare more space to download and unzip the file. You should make sure that the Chromebook has a minimum capacity of 8GB and 16GB is recommended. Otherwise, yous will fail to download and unzip the file and receive the "unable to unzip file" mistake.
Besides, the SD carte or USB drive you're using should accept at least 4GB free space. Here, you need to note that not all the drives accept the amount of advertised space. Hence, you are suggested to choice an 8GB drive if you're using a 4GB USB or SD card. If possible, go a 16GB drive.
Likewise read: How to Increase Disk Infinite for Laptop? Effort These Methods Now
Solution two: Run the Recovery Utility equally Admin
You should ensure that y'all run the Recovery Utility every bit admin while running it on Windows. When the prompt shows upward and asks for admin permission after you run the tool, click Allow.
Every bit an alternative, you can correct-click on the Chrome utility and select Run as administrator. Then click Allow to confirm the operation.
Tip: You are required to run the Chromebook Recovery Utility as admin to unzip the file.
Solution 3: Reformat the Drive
Try reformatting the SD card or USB drive to fix the unable to unzip the file error. Connect information technology to your PC and and then notice it on your desktop, File Explorer, or Disk Direction. Right-click on the drive and select Format. Then follow the prompted instruction to cease the formatting process.
Annotation: You lot should format the drive to FAT32. Other formats can crusade errors when yous run the recovery media.
You lot can as well try the SD card formatter – MiniTool Partition Wizard to format the bulldoze. This tool allows you lot to format external storage devices similar USB flash drives, TF cards, CF cards, and internal hard drives also.
Costless Download
Step 1: Connect the USB drive or SD card to your reckoner.
Step 2: Launch MiniTool Sectionalisation Wizard to enter its primary interface.
Step 3: Right-click on the USB drive or SD bill of fare from the disk map and click the Format selection in the pop-up menu. Alternatively, you lot can as well click on the target bulldoze and click Format Partitioning in the action panel.
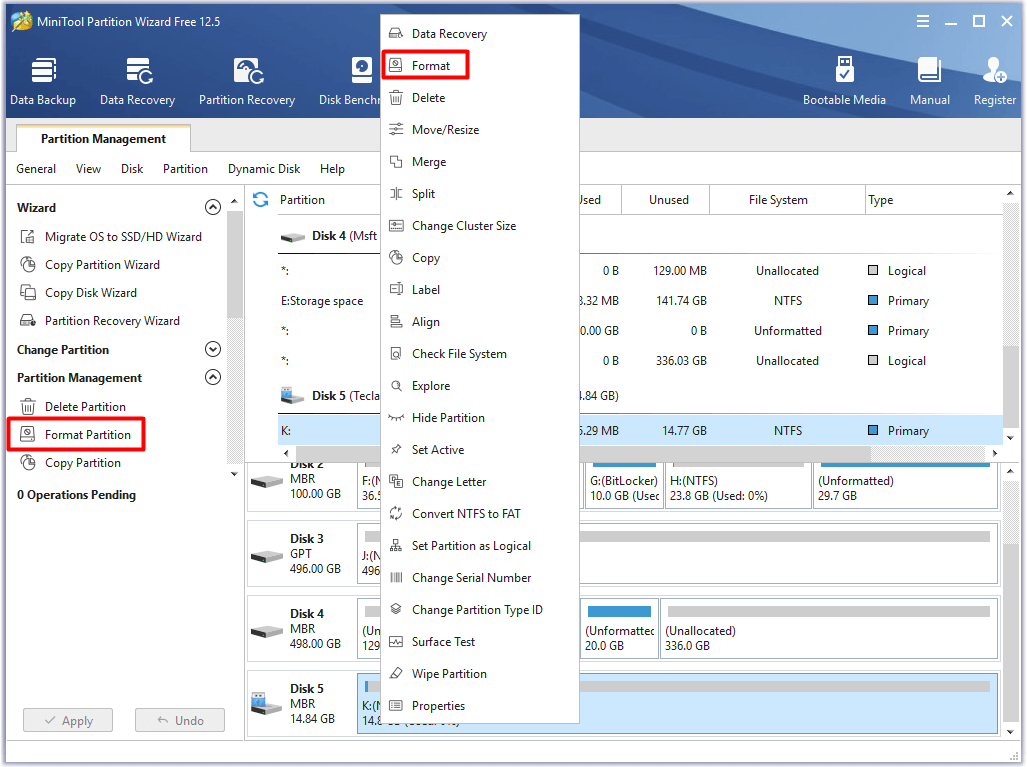
Footstep iv: In the Format Partition window, cull the FAT32 file system from the drop-downwards carte and click OK to salvage the changes. Later backing to the principal interface, click Utilize to carry out the pending operation.
Tip: You are also allowed to configure other settings like partition label and cluster size based on your need. If you don't set them, MiniTool Partition Wizard will format the drive with the default settings.

Recommended reading: 6 Possible Causes and 6 Bachelor Fixes for CRC Failed 7Zip
Solution 4: Wipe the Bulldoze
The Chromebook Recovery Utility usually erases the bulldoze while creating the recovery media. Withal, rogue files, virus, and malware sometimes can appear in the drive and disturb the procedure. Given that fact, you should ensure that there are no other media or files on the USB or SD bill of fare.
Tip: Powerful file deleters can assist you delete unremovable files speedily and effectively.
For the sake of security, you lot'd better erase the USB or SD card before starting the creating procedure. The Wipe Disk feature of MiniTool Partition Sorcerer enables you to wipe the disk completely quickly. Download and install this program, and and so follow the given steps to wipe the drive.
Free Download
Step 1: Also, connect the USB or SD bill of fare to your computer.
Step 2: Run MiniTool Segmentation Sorcerer and get to its main interface.
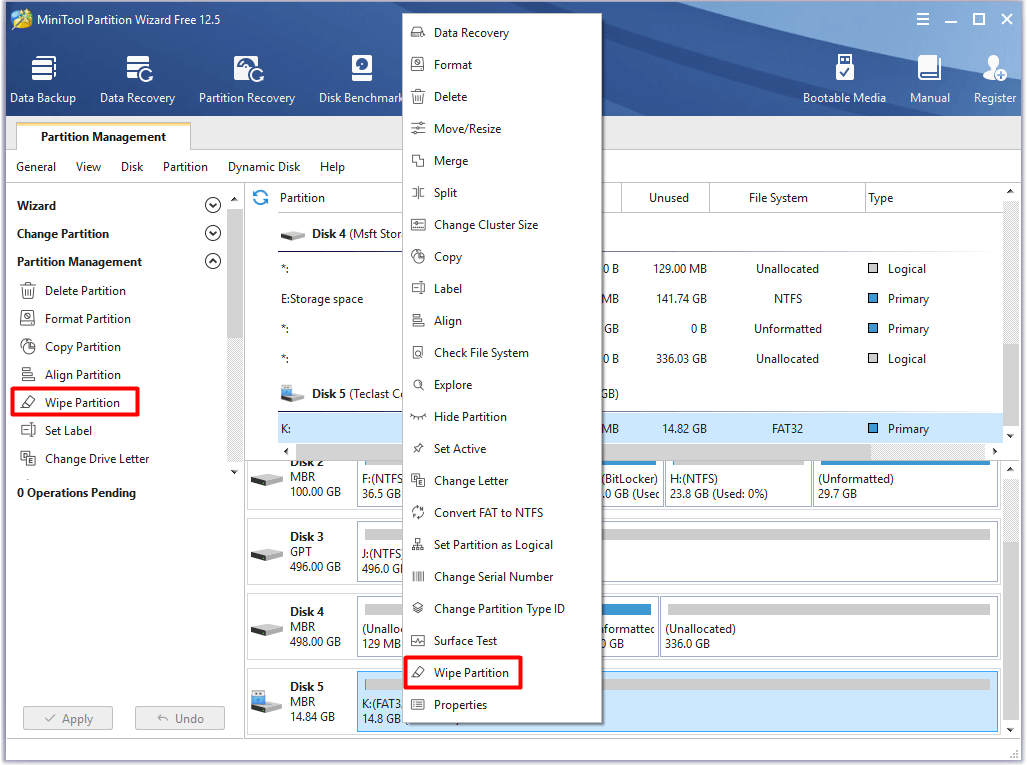
Step three: Click on the USB or SD bill of fare segmentation and click Wipe Partition in the action panel. You lot tin can as well right-click on information technology and click the Wipe Partitioning option in the contextual menu.
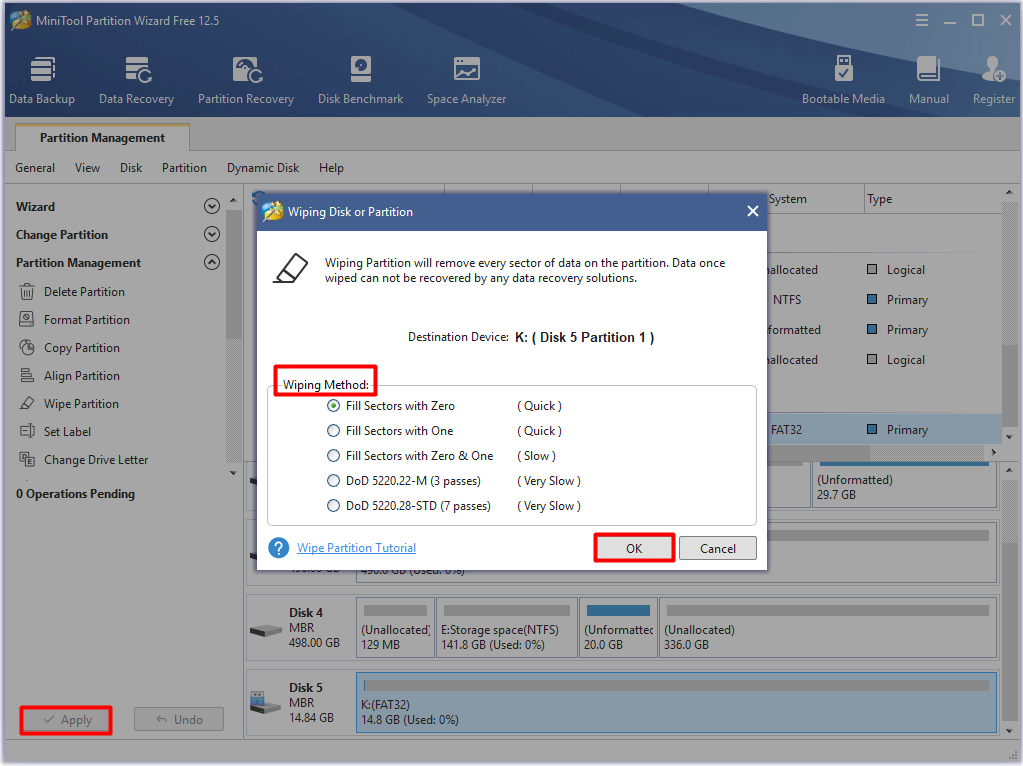
Pace 4: In the elevated window, choose a wiping method from the listing and click OK to relieve the changes. Finally, click the Apply button to execute the operation.
Annotation: The slower the process is, the higher security level you enjoy. It means that the wiped data tin can't be recovered by any data recovery programs.
#3. Verification Failed
The Chrome Bone recovery not working error can also occur because of the verification failure. Fortunately, the verification failed error tin can be solved by simply formatting the USB drive or SD card used to shop the recovery media.
Plug the USB bulldoze or SD bill of fare into your computer and then right-click on information technology later on information technology appears on the desktop. Then format the bulldoze to FAT32 by following the on-screen instruction.
Tip: If Windows doesn't recognize the bulldoze, y'all won't meet it on your figurer. If so, y'all can resolve the outcome by referring to this tutorial: Fix USB Flash Drive Non Recognized & Recover Data – How to Exercise
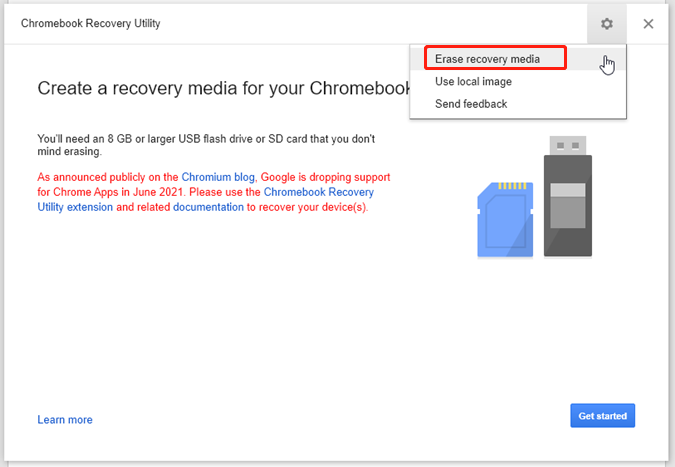
Later formatting the bulldoze, download and create the Chromebook Recovery Utility again. If this fails to work, navigate to the official website of the recovery and click Launch app. Correct-click on the gear icon in the next window and click Erase recovery media.
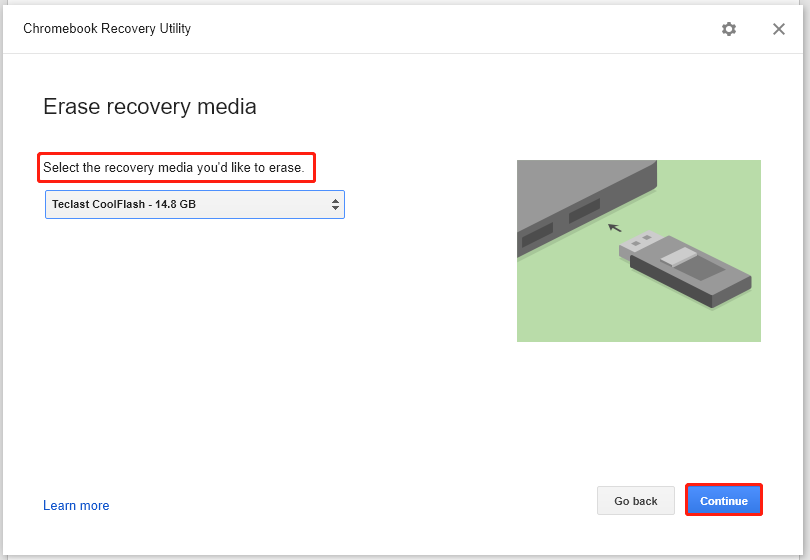
In the prompted window, choose the recovery media you'd like to erase and click Continue.
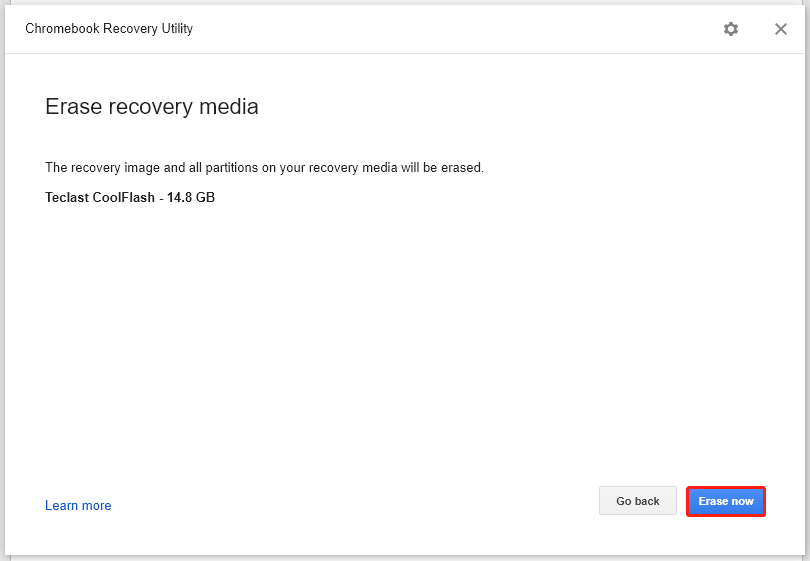
Click Erase now to begin the process. After the process ends, click Create another to get another recovery media.
When you lot want to duplicate versions of items, the fastest style is to copy and paste the target to the destination. Here's how to copy and paste on Chromebook.
#4. An Unexpected Error Has Occurred
As unsaid by its fault bulletin, the "An unexpected fault has occurred" issue indicates that Chrome Os has no idea of the specific reason. The primary reason for the error is that the recovery bulldoze is corrupted or fragmented.
Tip: You are able to fix a corrupted USB drive and recover data on information technology by following this guide: How to Recover Files From A Broken Or Corrupted USB Stick
To fix the error, y'all can try using a different USB drive or SD menu. Alternatively, plugging the drive into some other properly running PC and deleting all the files on it. Later on that, download some other copy of Chrome Bone and brand a recovery media again.
#5. The Device You Inserted Does Not Incorporate Chrome Os
The Chromebook Recovery Utility not working error may also occur when the device you lot inserted does not comprise Chrome OS. It means that the Chromebook tin can't detect the recovery image on the USB drive or SD card or at that place's no Chrome OS installed on the inserted drive.
For the first situation, attempt wiping the USB drive/SD carte du jour on the Windows or Mac device and then try the recovery once again. For the 2d situation, insert a USB drive or SD with a Chrome Bone installed to the device and continue the process.
#vi. Please Remove All Connected Devices and Start Recovery
When you receive the "Please remove all connected device and start recovery" error message, disconnect the plugged devices on your Chromebook including printer, external mouse or keyboard, external Television set or monitor, external hard drives, SD card, USB bulldoze, and USB peripherals.
After that, effort the recovery procedure once more to see if the Chrome OS recovery not working error is solved.
#seven. The Security Module on This Device Is Not Working
The security module on this device is not working error indicates that you are likely using a borrowed or loaned Chromebook from the schoolhouse or piece of work environment. These Chromebooks will block y'all from enabling the Programmer Manner/Power wash/recovery mode by default.
What's more, this sort of Chromebooks likewise affects the permission on your system. Once they are blocked, y'all take to contact your school or work network admin to unblock them.
Are you confused past the Chromebook Recovery Utility not working issue? Here are some available methods for you. You lot can have a attempt! Click to tweet
Bottom Line
To sum upwardly, this mail service mainly illustrates 7 oftentimes received problems that cause Chromebook Recovery Utility not working and their respective fixes. Yous can prepare the issue by following the offered solutions.
If you meet other bug that lead to the Chrome OS recovery not working consequence, please share them with usa in the comment area below. For any questions related to MiniTool Partition Wizard, please ship us an email via [email protected]. We will back y'all presently.
Source: https://www.partitionwizard.com/partitionmagic/chromebook-recovery-utility-not-working.html
0 Response to "Unable to Unzip the Fire Please Try Again Chromebook"
Post a Comment